Showing posts with label masonry heater. Show all posts

Wednesday, October 31, 2012

Masonry Heater Facing

We have finally finished facing our heater. We faced it with Brampton bricks from Hebron Brick. I like that our bricks came from just down the road a spell, even though my original hope was to find reclaimed bricks.

I don't have a lot of expert tips on slinging mud and laying bricks, since before this project I had never laid a brick. However, I do have some tips for beginners like me.

We set plumb lines for the corners, because I saw that most professionals do this. In order to set them I borrowed a laser plumb line from a friend of mine. It worked excellent and saved us a lot of time.

If you have never done any masonry before, make sure you have a wife that is willing to tool all the joints. My wife is good at it and hides a lot of my mistakes.

Tips specific to this heater.
My hardware came from Northstone Heat. Their customer service is top notch! Our hardware installation came with a learning curve. Our firebox door said for a 410 x 410mm door, you need a 420 x 420mm rough opening (approx. 16.5"). I would have gone with 17" x 17" if I were to do it again. The frame of the hardware would more than cover the gap and it would have made them easier to install and gave us more room for an expansion joint. We installed ours using the hammer drill and screws supplied with the doors.

We did the jack arch based on Marcus Flynn's description.  My Dad did an excellent job of drawing the template for us. I used the cardboard template to cut the bricks with a diamond blade on my miter saw. Even though it is an arch, we still opted for a steel lintel for peace of mind. I lined the lintel with ceramic paper in order to block some of the heat.

We chose to wrap the core of our heater with fiberglass for an expansion/slip joint. Some masons use cardboard but fiberglass seemed more professional to me. We used fiberglass mat that you can buy at auto parts stores. It is normally used for bondo work. It worked OK but it only came in 8 square foot pieces. It wasn't until we had already wrapped it that we found out there is a shop in town that repairs fiberglass boats and would have sold it to us off of a roll. So, look for boat shops near by. The front and back (where it is hottest) got four layers. The sides only got one. I also put an additional piece of ceramic paper above the firebox door (not seen in picture, sorry) to try to keep the mortar from cracking in a spot that will see a lot of heat.

We haven't been able to fire it yet, since we have to install the chimney now. Winter is coming and we have a large stack of firewood just begging for flame.

Sunday, January 29, 2012

Masonry Heater Part III: A Finished Finnish

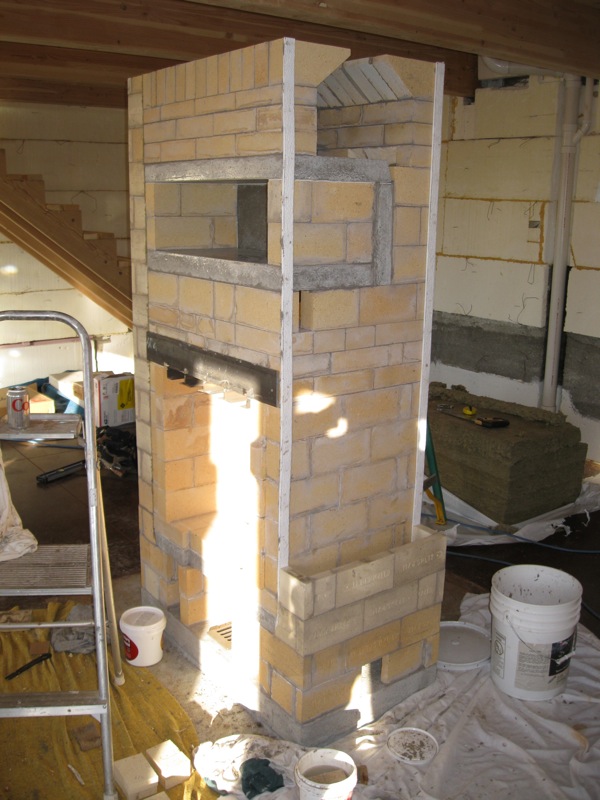
My 22" finnish contraflow heater core is finished. It probably isn't precision perfect, but considering I had never laid a brick before in my life; I'm pretty pleased with the outcome. The pictures below are my course by course outline (save for a couple courses I forgot to photograph).

I decided after I had the corners of the transition header in place, I would mortar four of the bricks together before I put them up. It worked fairly well except I was getting to the bottom of my mortar and a few hard chucks of mortar threw a couple bricks off kilter. Lesson learned.
Header bricks in place.
I only did a course by course of one side channel since they are both the same. This is the left side channel finished. It is worth mentioning that I used mineral wool on one side and ceramic paper on the other side. There were pros and cons of each, but overall I would probably use the ceramic paper again if it is available.
Course by course of the right side channel (ceramic wool gasket - 2 thicknesses of 1/8" paper).
This is a picture of the bond pattern. Each course contained a 4 3/4", 3 1/8", 3 3/8" and 2 full bricks.
1/8" ceramic paper gasket on the top. The pre cast capping slabs go on next. We did get them on with only two people but a third person would have been nice.
Capping slabs in place. Voila! Remember when I said that a couple transition header bricks got a little kittywampus. Those rogue bricks made it so the slabs had some air gaps in some locations. I remedied the situation by stuffing in chunks of mineral wool.
You can see the unevenness of the header bricks in this picture.
The ratchet strap was put on so the side channels wouldn't move while we were putting on the capping slabs. The side channels sit dry up against the ceramic paper gasket.

Now I just need to figure out the chimney and put the facing on. Excitement ensues!

Saturday, January 14, 2012

Masonry Heater Part II

I wanted to finish the center channel of the masonry heater today before I updated the blog, but I ran out of time and almost out of mortar. I decided to do the update anyway.
Inner firebox finished.
Lintel in place. The slots underneath will hold firebrick splits to form a heat shield.
My inner firebox ended up a little shorter than my outer firebox so I used some leftover castable refractory cement to bring it up to the same level.
The 2 inch gaps form a bypass channel that runs underneath the bake oven floor.
Bake oven floor is set in a bed of refractory mortar.
The back wall is gasketed with 1/8 inch ceramic paper and it sits dry.
Firebrick walls and back wall of the bake oven is gasketed with 1/8 inch ceramic paper.
Top of bake oven in place.
Channel behind the bake oven.
Flared rear channel tilted up so you can see the cuts.
Flare bricks in place.
In order to bring the front and back up to the same level we needed to rip 5/8 inch off the top course of the front bricks.
This is the start of the angled transition header that holds the capping slabs.
This is a view from the front.
Once the angled transition header is finished we will start to lay up the side channels.