Saturday, August 5, 2023

A Bunch of Concrete

 We filled our ICFs with 36 yards of concrete. It was our first experience on the business end of a pump truck. Don't worry, me and my bodyguard checked out the driver beforehand.

Jenn ran the pump hose while I ran the concrete vibrator.


Until this day, I did not know how much work this machine would be. It's heavy but doable.

We had two near misses during the pour. Our window bucks separated from the forms and we had to pause for my Dad to screw a piece of OSB across the buck and forms. Towards the end of our pour, my Mom (ol' eagle eye) spotted a bulging corner. Again we paused and my Dad and nephew screwed scrap lumber across the bulge. The day after our pour, I realized that all of our corners had separated a bit. Thankfully, none of them blew out. We used compact corners from LiteForm. I do not know their purpose, but I would not use them again. To be fair, LiteForm does make a full corner but they weren't available from our local Menards.

All and all, the pour went exceptionally well. We had a great pump truck operator who was very patient with newbies. After the forms were full, we wet set j-bolts that will lock down our mud plate. My bodyguard was also helpful in this aspect.
Currently, we are coating the forms with a foundation sealer in preparation for back fill. We all agree we are ready to move on from the basement part of the house. Bring on the framing!!

Saturday, July 22, 2023

We're Baaaaaack!

 If that title makes you salivate for delicious veggies and bread, let me stop you right there. We are not back to growing food for a living. We are back to building another homestead from the ground up.

Let's start with what happened to the original homestead. We sold it and traveled the country in our camper for a summer. That trip ended with my (Jared) first bout with cancer (brain to be specific). I recovered, we moved back to North Dakota, and continued with normal life ... for a while.

We decided we missed living the country life and bought 3 acres a few miles outside of town. We did some dreamin' and schemin' which ended with some house plans. We hired a digger to do what a digger do.


That went well and was of course exciting. We promptly got started forming up the footings using a product called form-a-drain. 


That was going well, until ... we both got diagnosed with different forms of cancer 10 days apart. We put the project on the shelf.

By God's good grace, we are both still here and healthy again. So naturally we wanted to start building again. Except ..... there was a near record-breaking winter in between. Which left us with an 8-foot-deep hole full of snow.

Which turned into a couple feet of water in the spring.
The above photo is after the first melt had dried up giving us enough time to redo the footing forms .... and then the spring rains.

We pumped water, and pumped water. When we were down to mud stage, we did some research on how to dry it up. The answer:


The answer is, you spread 800 pounds of lime by hand and it will dry it up. Also, every muscle you have will be on fire! Then, once you are healed; you, your wife, your father and your nephew bust your collective humps pouring the footings.

For this homestead we opted for a full basement which we stacked up with Insulated Concrete Forms (ICF). The brand we chose is called LiteForm; mostly because we could get them from out local Menards. Stacking them has gone well. It's like legos for adults. The following pictures are where we are at the time of this writing; inspection tomorrow and then schedule a pour.

What you are looking at is my wife in all her grace and balance spray foaming what is known as the 'common seam.' If you are like me and a seam like that makes your skin crawl, let me assure you, it is necessary. If you were to try to act like a brickie and follow the rule of "two over one, one over two", you would be buying a ticket on the struggle bus. We followed the advice of everyone who has ever done ICF, but I can see now that the 'lego' nobs won't line up unless you work from each corner and meet at a seam.
This is yours truly standing on top of the scaffolding I designed in my head and desperately hoped would work. Phew!

The secret ingredient is these roofing fall protection brackets (I call them roof jacks). I had used them previously for their intended purpose of roofing and deduced they would work in this situation.


What's great about this system is that all the lumber will be used to build the next phase of the house. The 2x6's will be walls on top of the treated 2x10's that will be the mud plate on top of our foundation walls.
Here is a gratuitous shot of us lifting a heavy window buck. We got to lift two of them, twice. After we had them in place, we decided they could be a little lower in the wall. We built them based on
this method.

As previously stated, we will be getting the stacked blocks inspected tomorrow and then scheduling a concrete truck and pump truck. Stay tuned!


Saturday, February 16, 2013

Off Grid Solar

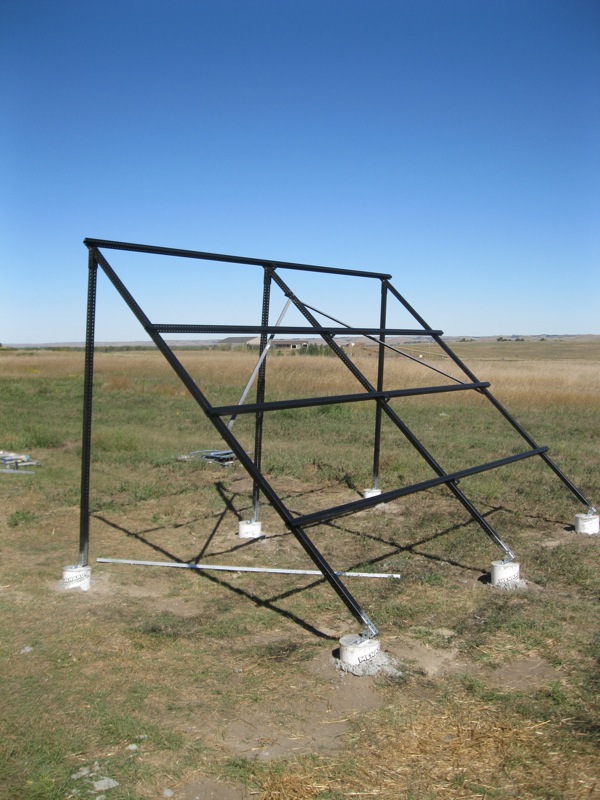
This post is long overdue, but after we moved into our stone cottage on the prairie after 2.5 years of hard work; we sort of took a break. Alas, there are things that need to be shared, some of them major. For starters, we are living completely off the grid with the use of our self installed PV system. Our only outside source of energy is our 1000 gallon propane tank (I use the term ‘only’ loosely). Here is a rundown of our system. It starts outside with 8 REC 235w solar panels. They are wired in 4 series strings of 2 panels each and mounted to our homemade tilt-able solar mount. It is constructed out of what is called telespar (stop sign post) with no welding. It has been strong and sturdy even in our heavy winds, although if I had to do it all over again I might use uni-strut instead of telespar. It is better suited for bolting together and they make all kinds of connectors for it.
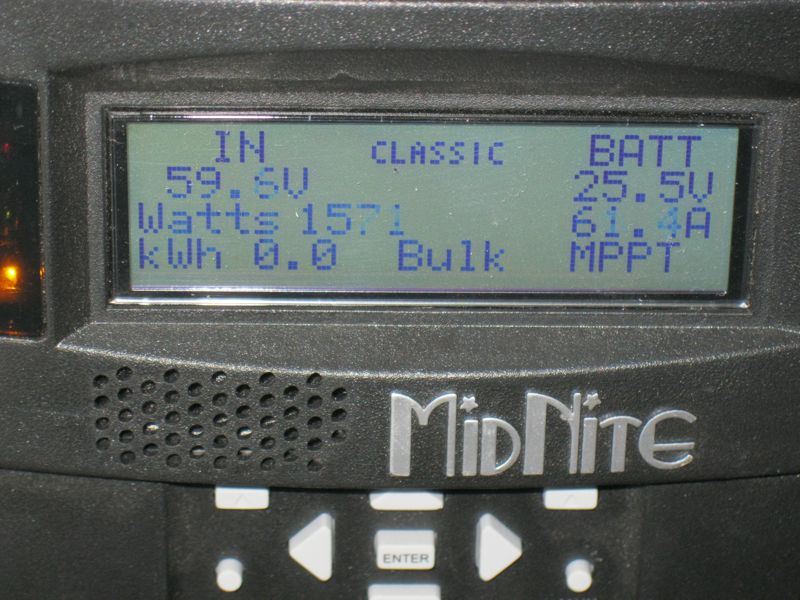
From the mount, the panels are wired into an MNPV6 combiner box. The combined output travels underground via #4 copper up to our loft. We bought a pre-wired E-panel from Midnite Solar which I would highly recommend to anyone who is a novice in producing their own energy. Our system includes the 240v E-panel, 4000w Magnum inverter/charger, the Midnite Solar Classic 150 charge controller and all the NEC required breakers and disconnects. It wasn’t cheap, but very very worth it. I don’t know that I would have been able to figure out the hook up without the components pre-wired to each other. Plus, inside the E-panel every bus and breaker is labeled so figuring out where to connect the wires to and from the system is a lot easier.
So, speaking of wires – this is how our system works.
DC power from the panels combined and sent to the E-panel via Classic charge controller
DC power is sent to 24v 500 amp hour battery bank (seen without finished enclosure) and inverter
  • Batteries are Interstate Batteries DCM0100 sealed AGMs
E-panel sends 120/240v AC power to our house breaker panel via inverter
Generac standby generator is plumbed into our propane tank and AC output goes up to the E-panel
  • From there we are either charging the batteries or running the house or both

The system comes with a remote panel that I have wired into my utility room so we can monitor /control the system from the main floor. We are constantly checking the SOC (state of charge). You can also monitor the input of the PV panels via the charger controller. I haven’t set it up yet, but I have an app downloaded to my computer that allows you to check the charge controller using a local area network (LAN). After spending some time with our system, we couldn’t be happier. We appreciate the sunshine even more than we did before.

So, that is the basics. Any questions?

On a side note. We also couldn’t be happier with our masonry heater. The constant radiant heat is awesome. And we are slowly but surely learning how to cook in the bake oven – including pizzas and rustic artisan loaves.

Wednesday, October 31, 2012

Masonry Heater Facing

We have finally finished facing our heater. We faced it with Brampton bricks from Hebron Brick. I like that our bricks came from just down the road a spell, even though my original hope was to find reclaimed bricks.

I don't have a lot of expert tips on slinging mud and laying bricks, since before this project I had never laid a brick. However, I do have some tips for beginners like me.

We set plumb lines for the corners, because I saw that most professionals do this. In order to set them I borrowed a laser plumb line from a friend of mine. It worked excellent and saved us a lot of time.

If you have never done any masonry before, make sure you have a wife that is willing to tool all the joints. My wife is good at it and hides a lot of my mistakes.

Tips specific to this heater.
My hardware came from Northstone Heat. Their customer service is top notch! Our hardware installation came with a learning curve. Our firebox door said for a 410 x 410mm door, you need a 420 x 420mm rough opening (approx. 16.5"). I would have gone with 17" x 17" if I were to do it again. The frame of the hardware would more than cover the gap and it would have made them easier to install and gave us more room for an expansion joint. We installed ours using the hammer drill and screws supplied with the doors.

We did the jack arch based on Marcus Flynn's description.  My Dad did an excellent job of drawing the template for us. I used the cardboard template to cut the bricks with a diamond blade on my miter saw. Even though it is an arch, we still opted for a steel lintel for peace of mind. I lined the lintel with ceramic paper in order to block some of the heat.

We chose to wrap the core of our heater with fiberglass for an expansion/slip joint. Some masons use cardboard but fiberglass seemed more professional to me. We used fiberglass mat that you can buy at auto parts stores. It is normally used for bondo work. It worked OK but it only came in 8 square foot pieces. It wasn't until we had already wrapped it that we found out there is a shop in town that repairs fiberglass boats and would have sold it to us off of a roll. So, look for boat shops near by. The front and back (where it is hottest) got four layers. The sides only got one. I also put an additional piece of ceramic paper above the firebox door (not seen in picture, sorry) to try to keep the mortar from cracking in a spot that will see a lot of heat.

We haven't been able to fire it yet, since we have to install the chimney now. Winter is coming and we have a large stack of firewood just begging for flame.

Sunday, September 16, 2012

More Finishing

Since the last post, we continue to put the finishing touches on the house. While it is very exciting to us, it may be uninteresting to readers. Nonetheless, here are a few pictures of some of the work.

We couldn't be happier with the way the staircase turned out. Especially since we did it ourselves. I must admit it, finish work makes me a lot more nervous than simple framing.
In the meantime we had our slab for the garage poured. And then we decided to do a four person barn raising. It was a lot of work and we should have planned for a few more people. We were very fortunate to have my Dad and Uncle there to help us even though neither of them is Amish.

While the finish work may be 'normal' and somewhat boring to readers. We still have a few surprises left up our sleeves.

Wednesday, July 25, 2012

Flashing the Field

No, this isn’t an activity in which I bare my chest to the wheat field next door. It’s a highly scientific and odd process involving electricity.

This week our generator inexplicably stopped producing electricity. The motor ran fine but nothing was coming out of the outlets. After checking the usual suspects;  breakers, wiring harnesses – I even took it apart and stared blankly at the AVR (auto voltage regulator) – we were stumped. Not knowing what to do we turned to the grandmaster of information. The internet. My wife did some research on the situation and found a hail mary. Flash the field. I can’t explain the science behind it because I’m not that bright. Nonetheless, it has something to do with the copper in the genset needing a little hand in remembering what its job is. So, we would try it.

There were a few different methods to take a crack at. The only one that seemed easy enough and safe enough for us to try was ‘the drill method’. Here’s how it works. Take a corded drill and plug it into your generator. With the generator running, set the drill to forward, pull the trigger and spin the chuck backwards. I’ll pause for giggles and snide remarks.

In order to spin the chuck of the corded drill fast enough my Dad came up with this idea: cut the head of a nail off and chuck both the corded drill and a cordless drill up to it. Essentially you use the cordless drill to spin the corded drill in reverse, which then acts as a tiny little generator sending a bit of current (the reminder) back into the big generator. If this all sounds ridiculous to you, it did to me too, but I’ll be darned if it didn’t work. The generator is working fine again.

One thing I should mention. Be ready to let go of the trigger of the corded drill. Once the generator remembers what its job is, it will immediately spin the drill. I don’t want to be responsible for any broken fingers out there.

Sunday, July 22, 2012

Making It Work

Over the last few weeks our key focus has been function. We've been running gas lines, putting in fixtures and just generally making things work. These are a few pictures of the progress.

This is the upstairs bathroom. It now has a working vanity and working toilet. I am currently working on plumbing in the shower and tub. It has proven to be a little bit more confusing than I thought but I am figuring it out and it should be done by the early part of this week.
Here is our kitchen complete with working appliances. I still have to hook up the supply water for the dishwasher, other than that it is nearing completion.
We can cook!
Another project I would like to tackle this week is plumbing in the water heater. A home isn't a home without a hot shower at the end of a long day.