Sunday, May 13, 2012

Wallcoverings

While we are busy hanging the pine carsiding upstairs, we hired a couple workers to hang drywall on the first floor. They should be back this week to tape and mud.
It's blue because it's pretty. Not really, it is mold resistant drywall. It's a little more expensive but we thought it was worth the money.
Also, we had them spray lacquer the beams and sealing.
So far we have the hallway and one bedroom mostly covered in pine. We are working up to the vaulted ceiling over our stairwell. It will be our pine finale.
Once the walls are covered we can work on putting in fixtures and making the house functional. We are so close to having toilets!

Sunday, April 1, 2012

The Goings On

Time flies, fun or no. I realize the other day that I hadn't written a blog since the end of January. The reason is probably because we have been busy with a thousand 'little' projects. Nothing monumental has really taken place. Well, maybe one thing.

I had to take some time away from the masonry heater in order to get the house ready for wiring. So, the heater still isn't done. At first it was hard to leave that project for a bit, but I soon decided it was okay since the winter was mild and the heating season would be nearly over by the time I got to fire it up for the first time.

Once we found an electrician that we were happy with, we had to figure out the best way to put wires in the wall. Our electrician convinced us to put up furring strips in order to attach drywall on the first floor. The plan prior to that was to tie on diamond lath and do plaster. Our hearts weren't set on plastering and the furring strips gave him something to attach boxes to. So that is one of the bigger projects we worked on.
After we finished, the wiring went in really fast. If you are in the Bismarck, ND area I highly recommend Eric and his crew at Milestone Builders. Top notch guys. Wiring isn't really exciting to look at but here are a couple of pictures to show how they did it.

 We went with an external panel to save space and because our utility room will technically be a bathroom also. Space is at a premium at our house.
We have also been spending some time on planting since spring came so early this year. These are grape prunings we are attempting to propagate. We took a lesson from a friend of my Dad's and it seems to work well for him. I'm not sure of the success we will have since our pruning material was rather small.
If they do grow, we will need more space in the vineyard. So today I began setting up professional style grape trellis. More to come on that.
I used to read a lot of owner builder blogs before we started building our house. I didn't like it when the author didn't post an external picture of the house every once in a while. So ...
This year we are going to attempt re-plant some of the grass that succumbed to the construction process.

Sunday, January 29, 2012

Masonry Heater Part III: A Finished Finnish

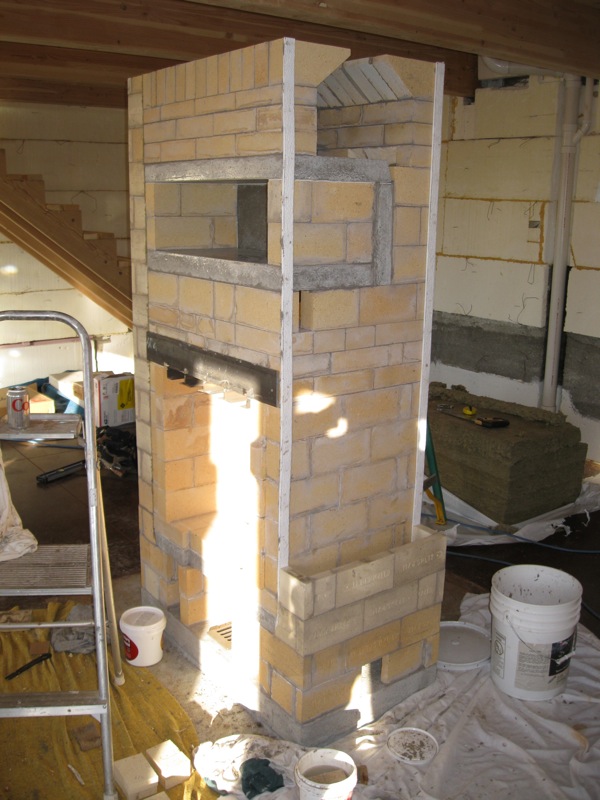
My 22" finnish contraflow heater core is finished. It probably isn't precision perfect, but considering I had never laid a brick before in my life; I'm pretty pleased with the outcome. The pictures below are my course by course outline (save for a couple courses I forgot to photograph).

I decided after I had the corners of the transition header in place, I would mortar four of the bricks together before I put them up. It worked fairly well except I was getting to the bottom of my mortar and a few hard chucks of mortar threw a couple bricks off kilter. Lesson learned.
Header bricks in place.
I only did a course by course of one side channel since they are both the same. This is the left side channel finished. It is worth mentioning that I used mineral wool on one side and ceramic paper on the other side. There were pros and cons of each, but overall I would probably use the ceramic paper again if it is available.
Course by course of the right side channel (ceramic wool gasket - 2 thicknesses of 1/8" paper).
This is a picture of the bond pattern. Each course contained a 4 3/4", 3 1/8", 3 3/8" and 2 full bricks.
1/8" ceramic paper gasket on the top. The pre cast capping slabs go on next. We did get them on with only two people but a third person would have been nice.
Capping slabs in place. Voila! Remember when I said that a couple transition header bricks got a little kittywampus. Those rogue bricks made it so the slabs had some air gaps in some locations. I remedied the situation by stuffing in chunks of mineral wool.
You can see the unevenness of the header bricks in this picture.
The ratchet strap was put on so the side channels wouldn't move while we were putting on the capping slabs. The side channels sit dry up against the ceramic paper gasket.

Now I just need to figure out the chimney and put the facing on. Excitement ensues!

Saturday, January 14, 2012

Masonry Heater Part II

I wanted to finish the center channel of the masonry heater today before I updated the blog, but I ran out of time and almost out of mortar. I decided to do the update anyway.
Inner firebox finished.
Lintel in place. The slots underneath will hold firebrick splits to form a heat shield.
My inner firebox ended up a little shorter than my outer firebox so I used some leftover castable refractory cement to bring it up to the same level.
The 2 inch gaps form a bypass channel that runs underneath the bake oven floor.
Bake oven floor is set in a bed of refractory mortar.
The back wall is gasketed with 1/8 inch ceramic paper and it sits dry.
Firebrick walls and back wall of the bake oven is gasketed with 1/8 inch ceramic paper.
Top of bake oven in place.
Channel behind the bake oven.
Flared rear channel tilted up so you can see the cuts.
Flare bricks in place.
In order to bring the front and back up to the same level we needed to rip 5/8 inch off the top course of the front bricks.
This is the start of the angled transition header that holds the capping slabs.
This is a view from the front.
Once the angled transition header is finished we will start to lay up the side channels.