This post is long overdue, but after we moved into our stone cottage on the
prairie after 2.5 years of hard work; we sort of took a break. Alas,
there are things that need to be shared, some of them major.
For starters, we are living completely off the grid with the use of
our self installed PV system. Our only outside source of energy is our
1000 gallon propane tank (I use the term ‘only’ loosely). Here is a
rundown of our system. It starts outside with
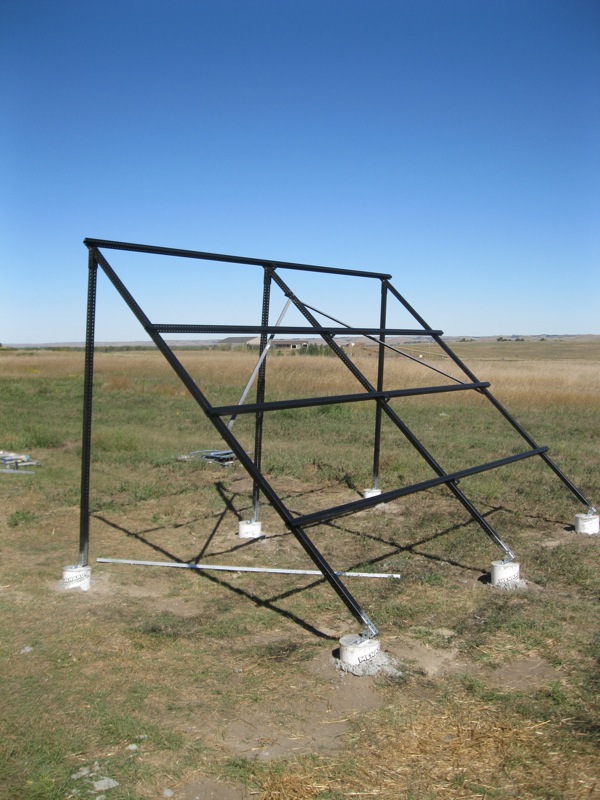
8 REC 235w solar panels. They are wired in 4 series strings of 2 panels
each and mounted to our homemade tilt-able solar mount. It is
constructed out of what is called telespar (stop sign post) with no
welding. It has been strong and sturdy even in our heavy
winds, although if I had to do it all over again I might use uni-strut
instead of telespar. It is better suited for bolting together and they
make all kinds of connectors for it.


From the mount, the panels are wired into an MNPV6 combiner box.
The combined output travels underground via #4 copper up to our loft. We
bought a pre-wired E-panel from Midnite Solar which I would highly
recommend to anyone who is a novice in producing
their own energy. Our system includes the 240v E-panel, 4000w Magnum
inverter/charger, the Midnite Solar Classic 150 charge controller and
all the NEC required breakers and disconnects. It wasn’t cheap, but very
very worth it. I don’t know that I would have
been able to figure out the hook up without the components pre-wired to
each other. Plus, inside the E-panel every bus and breaker is labeled so
figuring out where to connect the wires to and from the system is a lot
easier.
So, speaking of wires – this is how our system works.
DC power from the panels combined and sent to the E-panel via Classic charge controller
DC power is sent to 24v 500 amp hour battery bank (seen without finished enclosure) and inverter
- Batteries are Interstate Batteries DCM0100 sealed AGMs
E-panel sends 120/240v AC power to our house breaker panel via inverter
Generac standby generator is plumbed into our propane tank and AC output goes up to the E-panel
- From there we are either charging the batteries or running the house or both
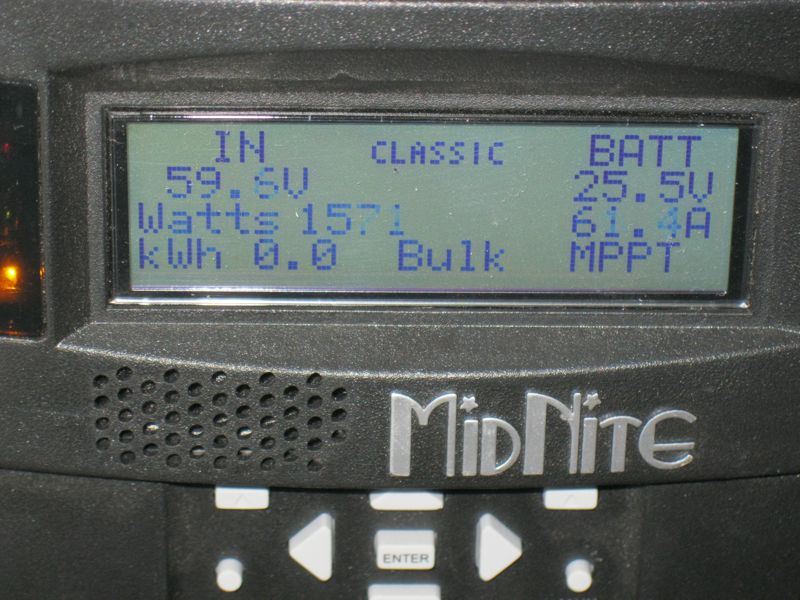
The system comes with a remote panel that I have wired into my
utility room so we can monitor /control the system from the main floor.
We are constantly checking the SOC (state of charge). You can also
monitor the input of the PV panels via the charger
controller. I haven’t set it up yet, but I have an app downloaded to my
computer that allows you to check the charge controller using a local
area network (LAN). After spending some time with our system, we
couldn’t be happier. We appreciate the sunshine even
more than we did before.
So, that is the basics. Any questions?
On a side note. We also couldn’t be happier with our masonry
heater. The constant radiant heat is awesome. And we are slowly but
surely learning how to cook in the bake oven – including pizzas and
rustic artisan loaves.


fantastic! referring the hubby over to your solar info as that is something we have been thinking about doing for those times when fire/ice/any dangerous thing decides to pull the electric cord out on us (we do have a 1000 gallon propane tank though :)
ReplyDeleteHave you gotten an oven temperature gauge yet? they make "stand alones" ; but it is VERY IMPORTANT to remove it before you fire up the stove LOL I have burned up many LOL...otherwise pizza was the very first thing we made too ;) we also purchased stoneware (lidded casseroles, stonewear sheets etc.) and also a wood paddle to use to slide them in and out. In fact thats where I have actually made roasted chicken and once even a duck using a covered casserole dish :) but another side note - make sure you remember to ALSO REMOVE THE STONEWARE before you fire up the stove LOL
yes, sometimes it was an expensive meal...LOL
Good cooking tips! I am definitely not a professional PV installer, but I would gladly answer any questions that I can.
ReplyDeleteThanks for the update Jared good on you for going off grid (except for the propane). I am really impressed with everything you two and your friends and family have accomplished.
ReplyDeletehey. the statistics here are mind boggling. thanks for sharing such informative blogs. they do really motivate on going green .
ReplyDeleteSolar PV Mount
well written blog with useful information about Inverter with Charger.
ReplyDeleteInverter with Charger
Thanks!
ReplyDeleteNice to see your heater and oven all completed and operational. I'm jealous, but delighted you posted these build blogs.
ReplyDeleteHow did you end up venting your heater? Through the floor? or building on an additional chimney, or venting out the top of the heater? Could you send or post another picture of that (or send pics privately to me at jdgTWO3NINE@gmail.com (substitute letters for numbers)
How's everything working out? Any chance of an update post?
ReplyDeleteSo, we need an update.....
ReplyDeleteSo, we need an update.....
ReplyDeleteSuper blog and very interesting work in your blog thank for sharing this blog.
ReplyDeletesolar inverters
Thanks for this blog. How big is your home? Any rough estimate how many hours and cost to put it up?
ReplyDeleteWould love to hear how the home functions for you, as well as any resources you found helpful.
With Cadillacs Roofing, you are guaranteed to get high quality products that will last with your new roof system. Cadillacs Roofing takes into account the many different variables that will help you have a longer lasting new roofing system when being inspected. With almost every roof being different, we analyze problem areas and come up with solutions meant to last.
ReplyDeleteOne of the most important contributing factors to a long last energy efficient roof is ventilation. Cadillacs Roofing will install the appropriate ventilation in order to help you save money on your bills. With the right amount of insulation, and intake and exhaust venting on your roof you will feel the difference in your home after Cadillacs Roofing installs a new roof system.
At Cadillacs Roofing, we install one of the best shingles on the Canadian market. These shingles will not only protect your roof but make it stand out with the beautiful colour choices available. The roofing system installed by Cadillacs Roofing will raise the value of your home when a complete roofing system is installed.
Address: 37 Bankfield drive, Etobicoke Ontario, m9v2p7
Phone: (647) 877-3144
business email: info@cadillacsroofing.com