Wednesday, October 31, 2012

Masonry Heater Facing

We have finally finished facing our heater. We faced it with Brampton bricks from Hebron Brick. I like that our bricks came from just down the road a spell, even though my original hope was to find reclaimed bricks.

I don't have a lot of expert tips on slinging mud and laying bricks, since before this project I had never laid a brick. However, I do have some tips for beginners like me.

We set plumb lines for the corners, because I saw that most professionals do this. In order to set them I borrowed a laser plumb line from a friend of mine. It worked excellent and saved us a lot of time.

If you have never done any masonry before, make sure you have a wife that is willing to tool all the joints. My wife is good at it and hides a lot of my mistakes.

Tips specific to this heater.
My hardware came from Northstone Heat. Their customer service is top notch! Our hardware installation came with a learning curve. Our firebox door said for a 410 x 410mm door, you need a 420 x 420mm rough opening (approx. 16.5"). I would have gone with 17" x 17" if I were to do it again. The frame of the hardware would more than cover the gap and it would have made them easier to install and gave us more room for an expansion joint. We installed ours using the hammer drill and screws supplied with the doors.

We did the jack arch based on Marcus Flynn's description.  My Dad did an excellent job of drawing the template for us. I used the cardboard template to cut the bricks with a diamond blade on my miter saw. Even though it is an arch, we still opted for a steel lintel for peace of mind. I lined the lintel with ceramic paper in order to block some of the heat.

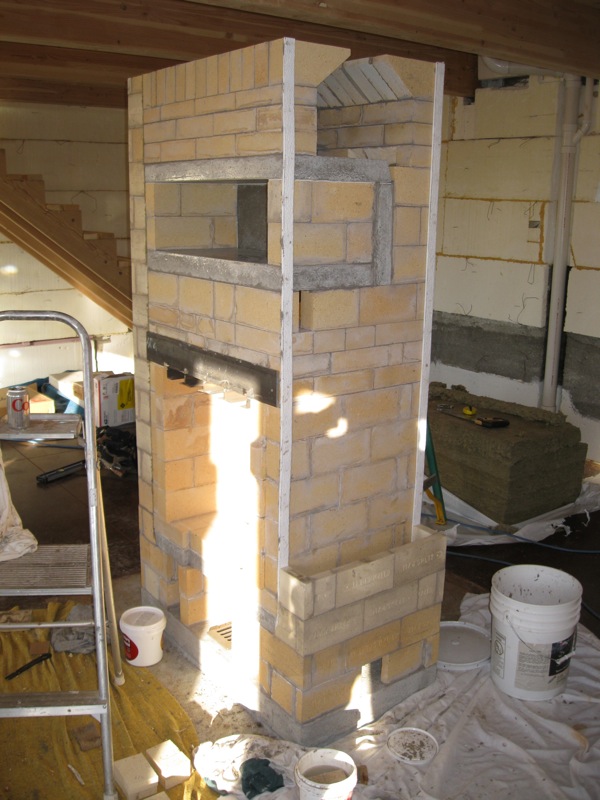
We chose to wrap the core of our heater with fiberglass for an expansion/slip joint. Some masons use cardboard but fiberglass seemed more professional to me. We used fiberglass mat that you can buy at auto parts stores. It is normally used for bondo work. It worked OK but it only came in 8 square foot pieces. It wasn't until we had already wrapped it that we found out there is a shop in town that repairs fiberglass boats and would have sold it to us off of a roll. So, look for boat shops near by. The front and back (where it is hottest) got four layers. The sides only got one. I also put an additional piece of ceramic paper above the firebox door (not seen in picture, sorry) to try to keep the mortar from cracking in a spot that will see a lot of heat.

We haven't been able to fire it yet, since we have to install the chimney now. Winter is coming and we have a large stack of firewood just begging for flame.

Sunday, September 16, 2012

More Finishing

Since the last post, we continue to put the finishing touches on the house. While it is very exciting to us, it may be uninteresting to readers. Nonetheless, here are a few pictures of some of the work.

We couldn't be happier with the way the staircase turned out. Especially since we did it ourselves. I must admit it, finish work makes me a lot more nervous than simple framing.
In the meantime we had our slab for the garage poured. And then we decided to do a four person barn raising. It was a lot of work and we should have planned for a few more people. We were very fortunate to have my Dad and Uncle there to help us even though neither of them is Amish.

While the finish work may be 'normal' and somewhat boring to readers. We still have a few surprises left up our sleeves.

Wednesday, July 25, 2012

Flashing the Field

No, this isn’t an activity in which I bare my chest to the wheat field next door. It’s a highly scientific and odd process involving electricity.

This week our generator inexplicably stopped producing electricity. The motor ran fine but nothing was coming out of the outlets. After checking the usual suspects;  breakers, wiring harnesses – I even took it apart and stared blankly at the AVR (auto voltage regulator) – we were stumped. Not knowing what to do we turned to the grandmaster of information. The internet. My wife did some research on the situation and found a hail mary. Flash the field. I can’t explain the science behind it because I’m not that bright. Nonetheless, it has something to do with the copper in the genset needing a little hand in remembering what its job is. So, we would try it.

There were a few different methods to take a crack at. The only one that seemed easy enough and safe enough for us to try was ‘the drill method’. Here’s how it works. Take a corded drill and plug it into your generator. With the generator running, set the drill to forward, pull the trigger and spin the chuck backwards. I’ll pause for giggles and snide remarks.

In order to spin the chuck of the corded drill fast enough my Dad came up with this idea: cut the head of a nail off and chuck both the corded drill and a cordless drill up to it. Essentially you use the cordless drill to spin the corded drill in reverse, which then acts as a tiny little generator sending a bit of current (the reminder) back into the big generator. If this all sounds ridiculous to you, it did to me too, but I’ll be darned if it didn’t work. The generator is working fine again.

One thing I should mention. Be ready to let go of the trigger of the corded drill. Once the generator remembers what its job is, it will immediately spin the drill. I don’t want to be responsible for any broken fingers out there.

Sunday, July 22, 2012

Making It Work

Over the last few weeks our key focus has been function. We've been running gas lines, putting in fixtures and just generally making things work. These are a few pictures of the progress.

This is the upstairs bathroom. It now has a working vanity and working toilet. I am currently working on plumbing in the shower and tub. It has proven to be a little bit more confusing than I thought but I am figuring it out and it should be done by the early part of this week.
Here is our kitchen complete with working appliances. I still have to hook up the supply water for the dishwasher, other than that it is nearing completion.
We can cook!
Another project I would like to tackle this week is plumbing in the water heater. A home isn't a home without a hot shower at the end of a long day.

Saturday, June 23, 2012

Wallcoverings II

Ninety-five percent of our walls are covered and finished. The exceptions being one wall in our bedroom and the utility room. The bedroom wall because it is a foam wall that takes a different skill set and the utility room because I am still doing some plumbing in there. The pictures below are the pine upstairs. It was a fairly big project (especially the vaulted area above the stairs) but we couldn't be happier with it. Our point and shoot camera doesn't do a very good job of capturing the vastness of the vaulted stairwell, but here it is.
I called this our sistine bedroom because of all the 'artfully' cut angles. You can see I still have one spot where all the angles come together to figure out.
That's the foam wall that still needs to be finished.
Here is a bird's eye view of the finished walls on the first floor ... and a lot of tools and mess.
In other news. I have finally pumped water out of our well. This may not seem like a large feat for anyone reading this, but it was a big deal to me as my plumbing and electrical skills are lacking. We are using a Grundfos deep well pump and a Square D pumptrol switch with a 32 gallon pressure tank.
I left the wires long because I wasn't all that confident that I was going to get it right on the first try, so they still need to be cleaned up a bit.
Next week, a toilet! Indoors!

Sunday, May 13, 2012

Wallcoverings

While we are busy hanging the pine carsiding upstairs, we hired a couple workers to hang drywall on the first floor. They should be back this week to tape and mud.
It's blue because it's pretty. Not really, it is mold resistant drywall. It's a little more expensive but we thought it was worth the money.
Also, we had them spray lacquer the beams and sealing.
So far we have the hallway and one bedroom mostly covered in pine. We are working up to the vaulted ceiling over our stairwell. It will be our pine finale.
Once the walls are covered we can work on putting in fixtures and making the house functional. We are so close to having toilets!

Sunday, April 1, 2012

The Goings On

Time flies, fun or no. I realize the other day that I hadn't written a blog since the end of January. The reason is probably because we have been busy with a thousand 'little' projects. Nothing monumental has really taken place. Well, maybe one thing.

I had to take some time away from the masonry heater in order to get the house ready for wiring. So, the heater still isn't done. At first it was hard to leave that project for a bit, but I soon decided it was okay since the winter was mild and the heating season would be nearly over by the time I got to fire it up for the first time.

Once we found an electrician that we were happy with, we had to figure out the best way to put wires in the wall. Our electrician convinced us to put up furring strips in order to attach drywall on the first floor. The plan prior to that was to tie on diamond lath and do plaster. Our hearts weren't set on plastering and the furring strips gave him something to attach boxes to. So that is one of the bigger projects we worked on.
After we finished, the wiring went in really fast. If you are in the Bismarck, ND area I highly recommend Eric and his crew at Milestone Builders. Top notch guys. Wiring isn't really exciting to look at but here are a couple of pictures to show how they did it.

 We went with an external panel to save space and because our utility room will technically be a bathroom also. Space is at a premium at our house.
We have also been spending some time on planting since spring came so early this year. These are grape prunings we are attempting to propagate. We took a lesson from a friend of my Dad's and it seems to work well for him. I'm not sure of the success we will have since our pruning material was rather small.
If they do grow, we will need more space in the vineyard. So today I began setting up professional style grape trellis. More to come on that.
I used to read a lot of owner builder blogs before we started building our house. I didn't like it when the author didn't post an external picture of the house every once in a while. So ...
This year we are going to attempt re-plant some of the grass that succumbed to the construction process.

Sunday, January 29, 2012

Masonry Heater Part III: A Finished Finnish

My 22" finnish contraflow heater core is finished. It probably isn't precision perfect, but considering I had never laid a brick before in my life; I'm pretty pleased with the outcome. The pictures below are my course by course outline (save for a couple courses I forgot to photograph).

I decided after I had the corners of the transition header in place, I would mortar four of the bricks together before I put them up. It worked fairly well except I was getting to the bottom of my mortar and a few hard chucks of mortar threw a couple bricks off kilter. Lesson learned.
Header bricks in place.
I only did a course by course of one side channel since they are both the same. This is the left side channel finished. It is worth mentioning that I used mineral wool on one side and ceramic paper on the other side. There were pros and cons of each, but overall I would probably use the ceramic paper again if it is available.
Course by course of the right side channel (ceramic wool gasket - 2 thicknesses of 1/8" paper).
This is a picture of the bond pattern. Each course contained a 4 3/4", 3 1/8", 3 3/8" and 2 full bricks.
1/8" ceramic paper gasket on the top. The pre cast capping slabs go on next. We did get them on with only two people but a third person would have been nice.
Capping slabs in place. Voila! Remember when I said that a couple transition header bricks got a little kittywampus. Those rogue bricks made it so the slabs had some air gaps in some locations. I remedied the situation by stuffing in chunks of mineral wool.
You can see the unevenness of the header bricks in this picture.
The ratchet strap was put on so the side channels wouldn't move while we were putting on the capping slabs. The side channels sit dry up against the ceramic paper gasket.

Now I just need to figure out the chimney and put the facing on. Excitement ensues!